

Creating your first Quote
Creating Quotes in MonetizeNow
This guide shows you how to build a quote, get it approved, and get it ready to send to your customer. No technical knowledge needed.
| Section | Read this when you want to… |
|---|---|
| Walkthrough: Create your first quote | build a quote from start to finish, step by step |
| Quick how-tos | do one specific thing, like renew a contract or change a contact |
| Cheat sheet | look up what a field, button or quote status means |
| Good to know | understand why quoting works the way it does |
Walkthrough: Create your first quote
In about 10 minutes you'll build a two-year quote for a customer called Northwind Traders: a bundle of products, a 10% discount, and a request for your manager's approval. Follow along exactly the first time. Once you're comfortable, the quick how-tos cover the variations.
Prefer to click along? Watch the interactive walkthrough:
Before you start
Your admin or RevOps team should already have set up:
- the products you sell
- at least one offering, a package of products with its prices
- the customer's account
- at least one contact at that customer
If you can't see a New Quote button, ask your admin to give you quoting access.
Step 1: Start a new quote
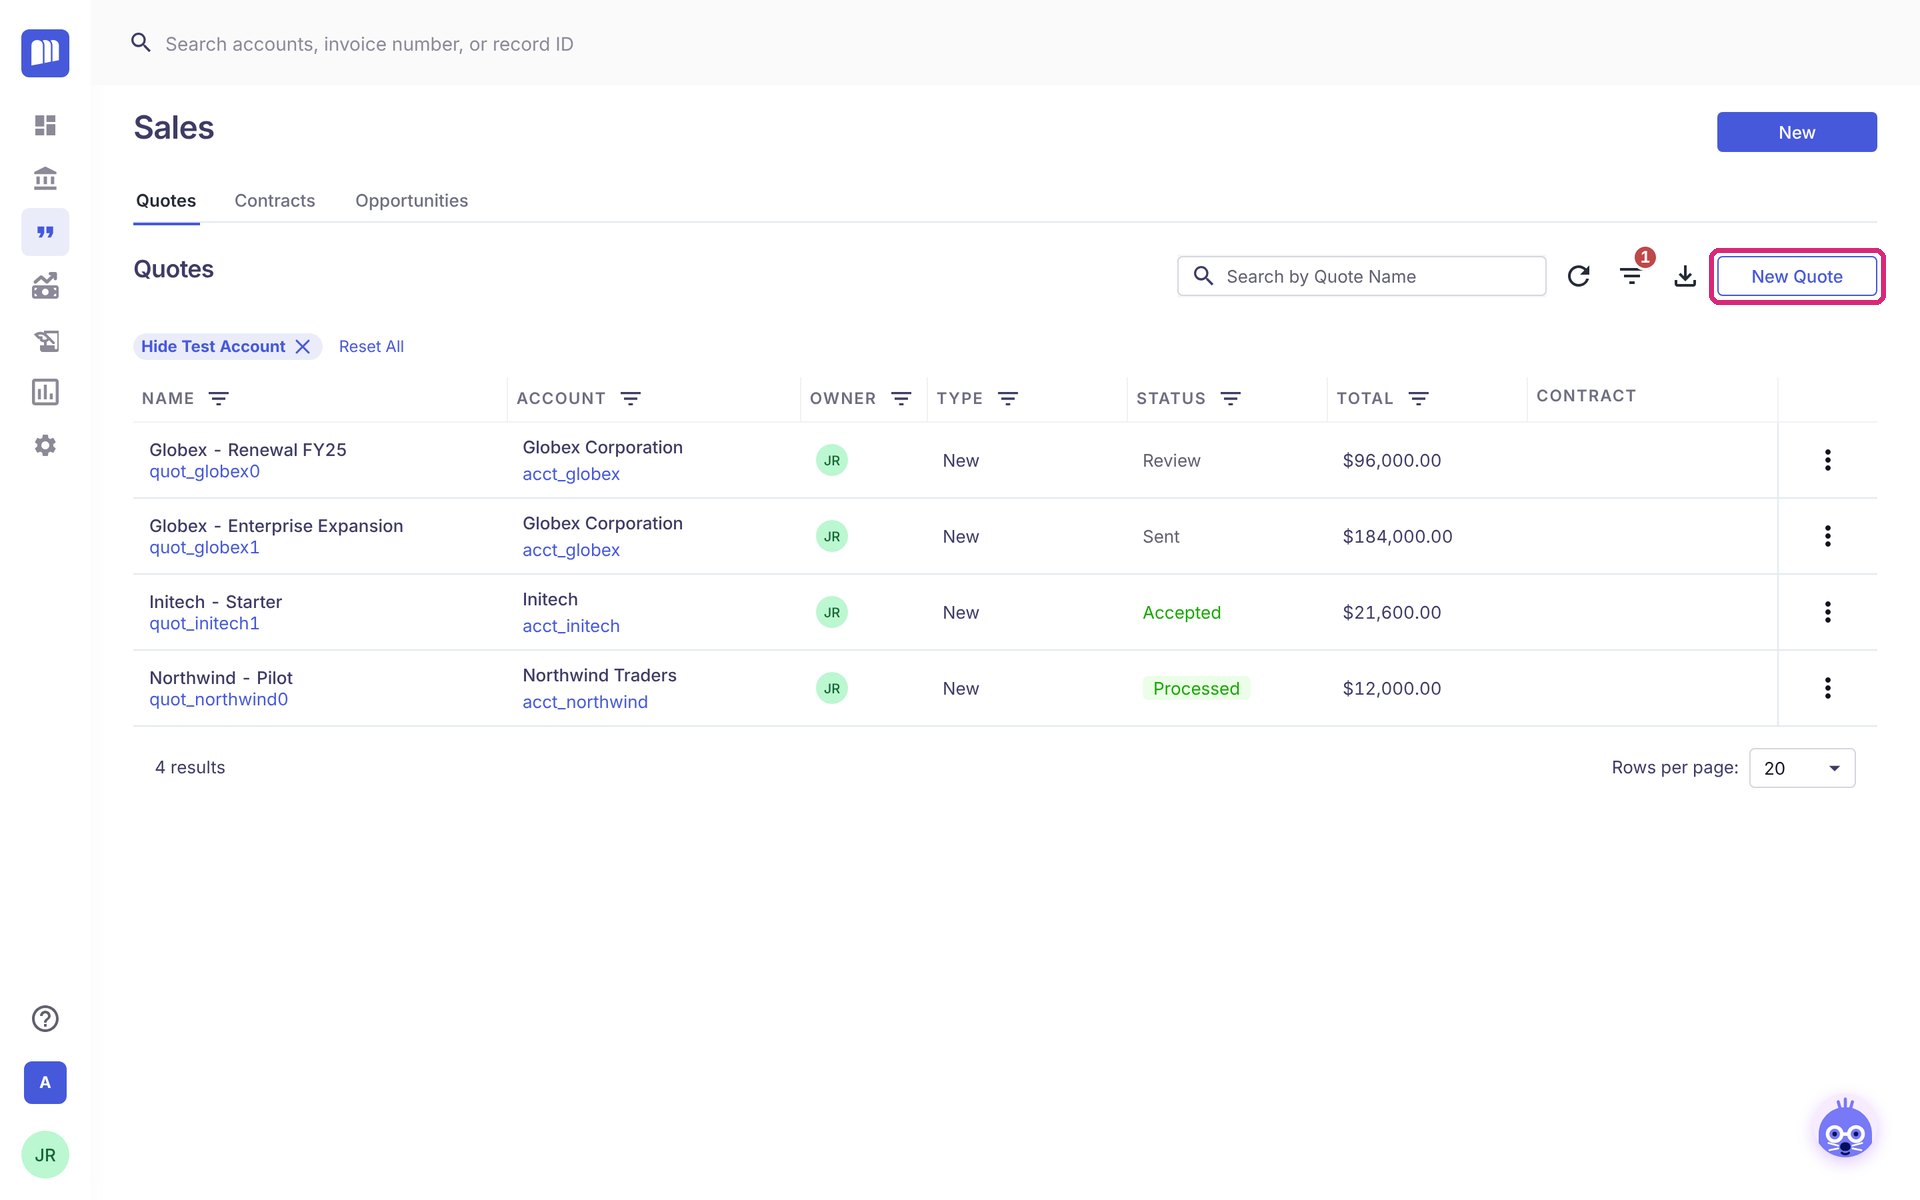
- Click Sales in the menu on the left. Your list of quotes opens.
- Click New Quote.
Step 2: Pick your customer
- Under Existing Account, start typing the customer's name (for example,
North). - Click Northwind Traders in the list.
- Leave Select Contract set to + New Contract. That's the right choice for any brand-new deal.
- Click Create.
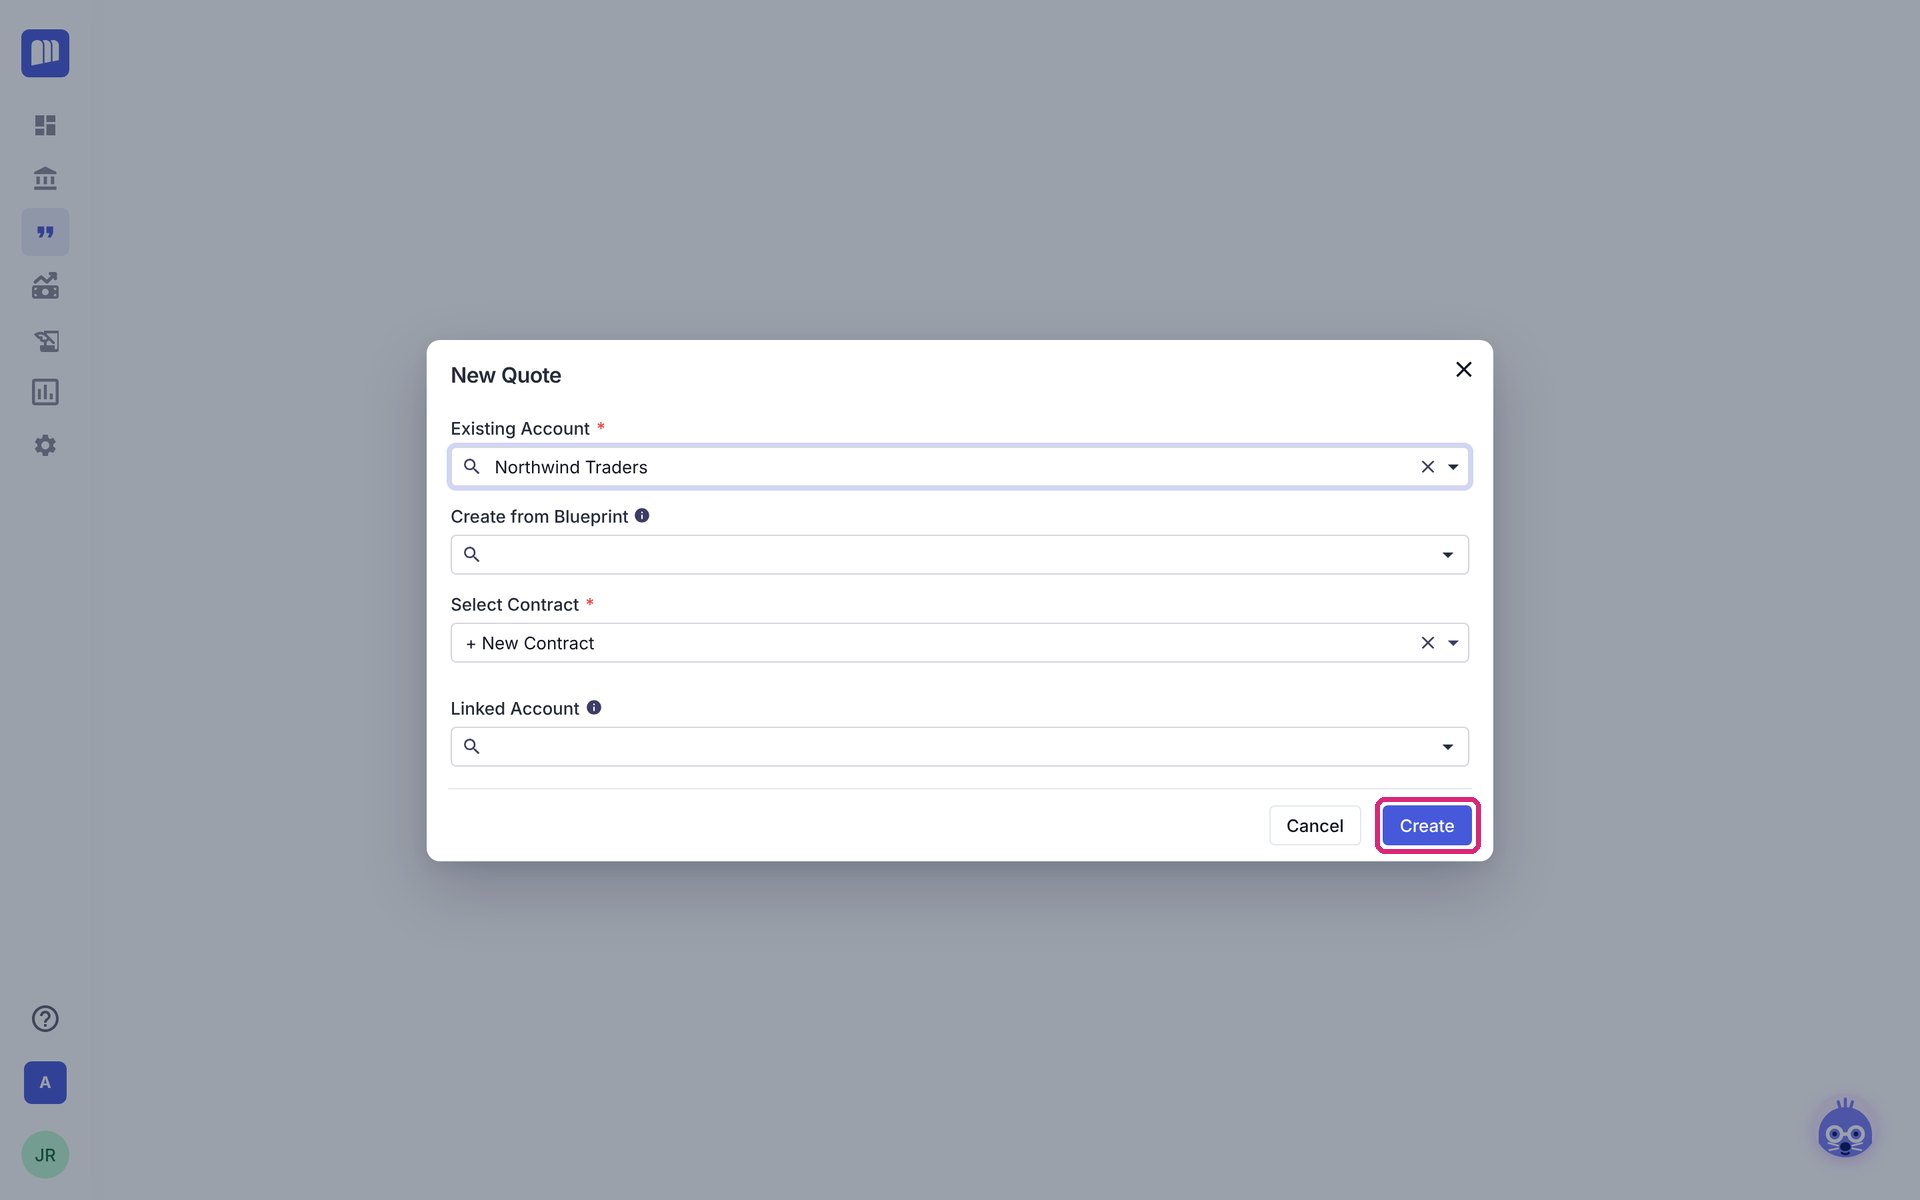
Your quote opens as a Draft. Good news: you never need to click Save on this page. Every change saves on its own, and you'll see Saved at the top.
Step 3: Choose who the quote is for
- In the Contacts box, click Select next to Shipping Contact.
- Click Dana Whitfield.
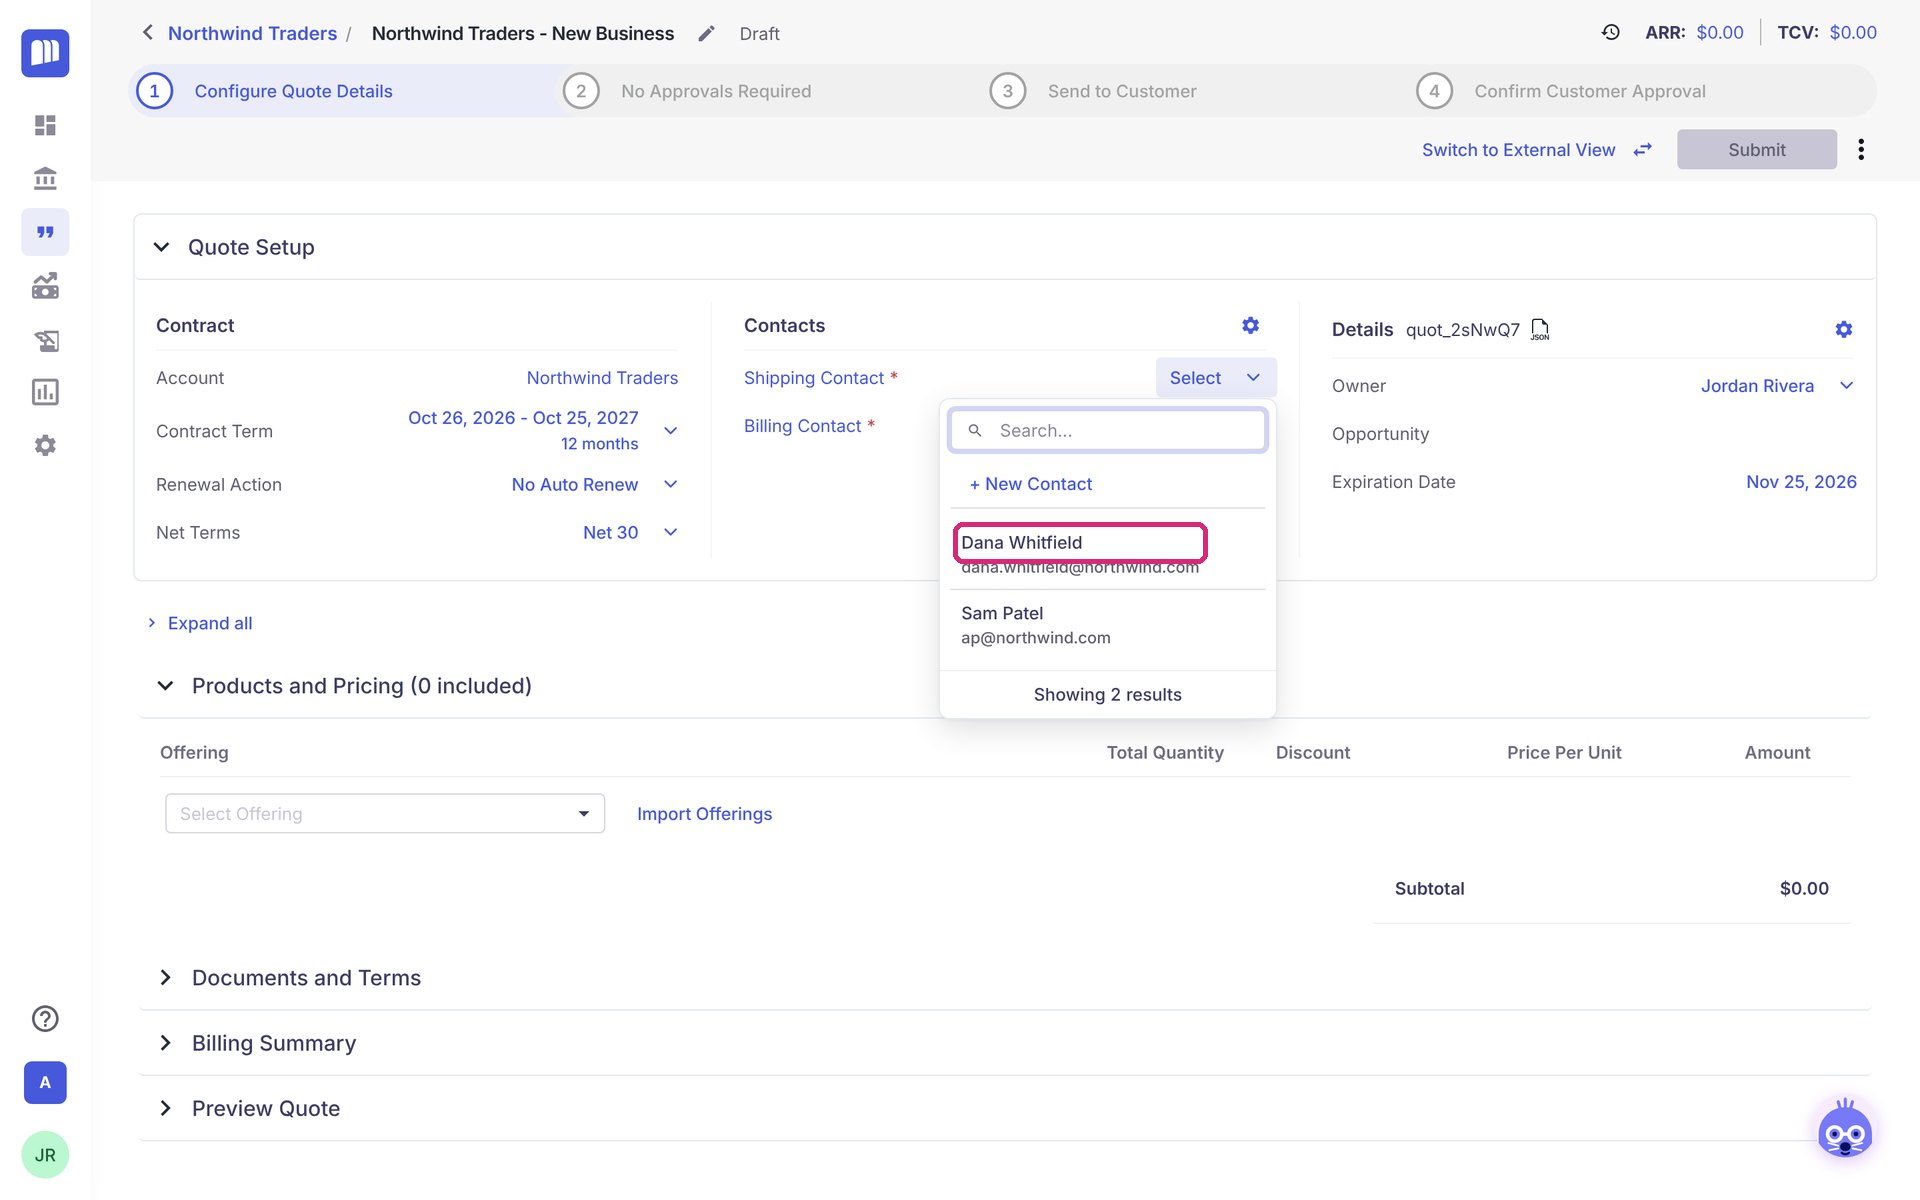
The Billing Contact (the person who gets the invoices) is set to the same person. You can change it if someone else pays the bills.
Step 4: Make it a two-year deal
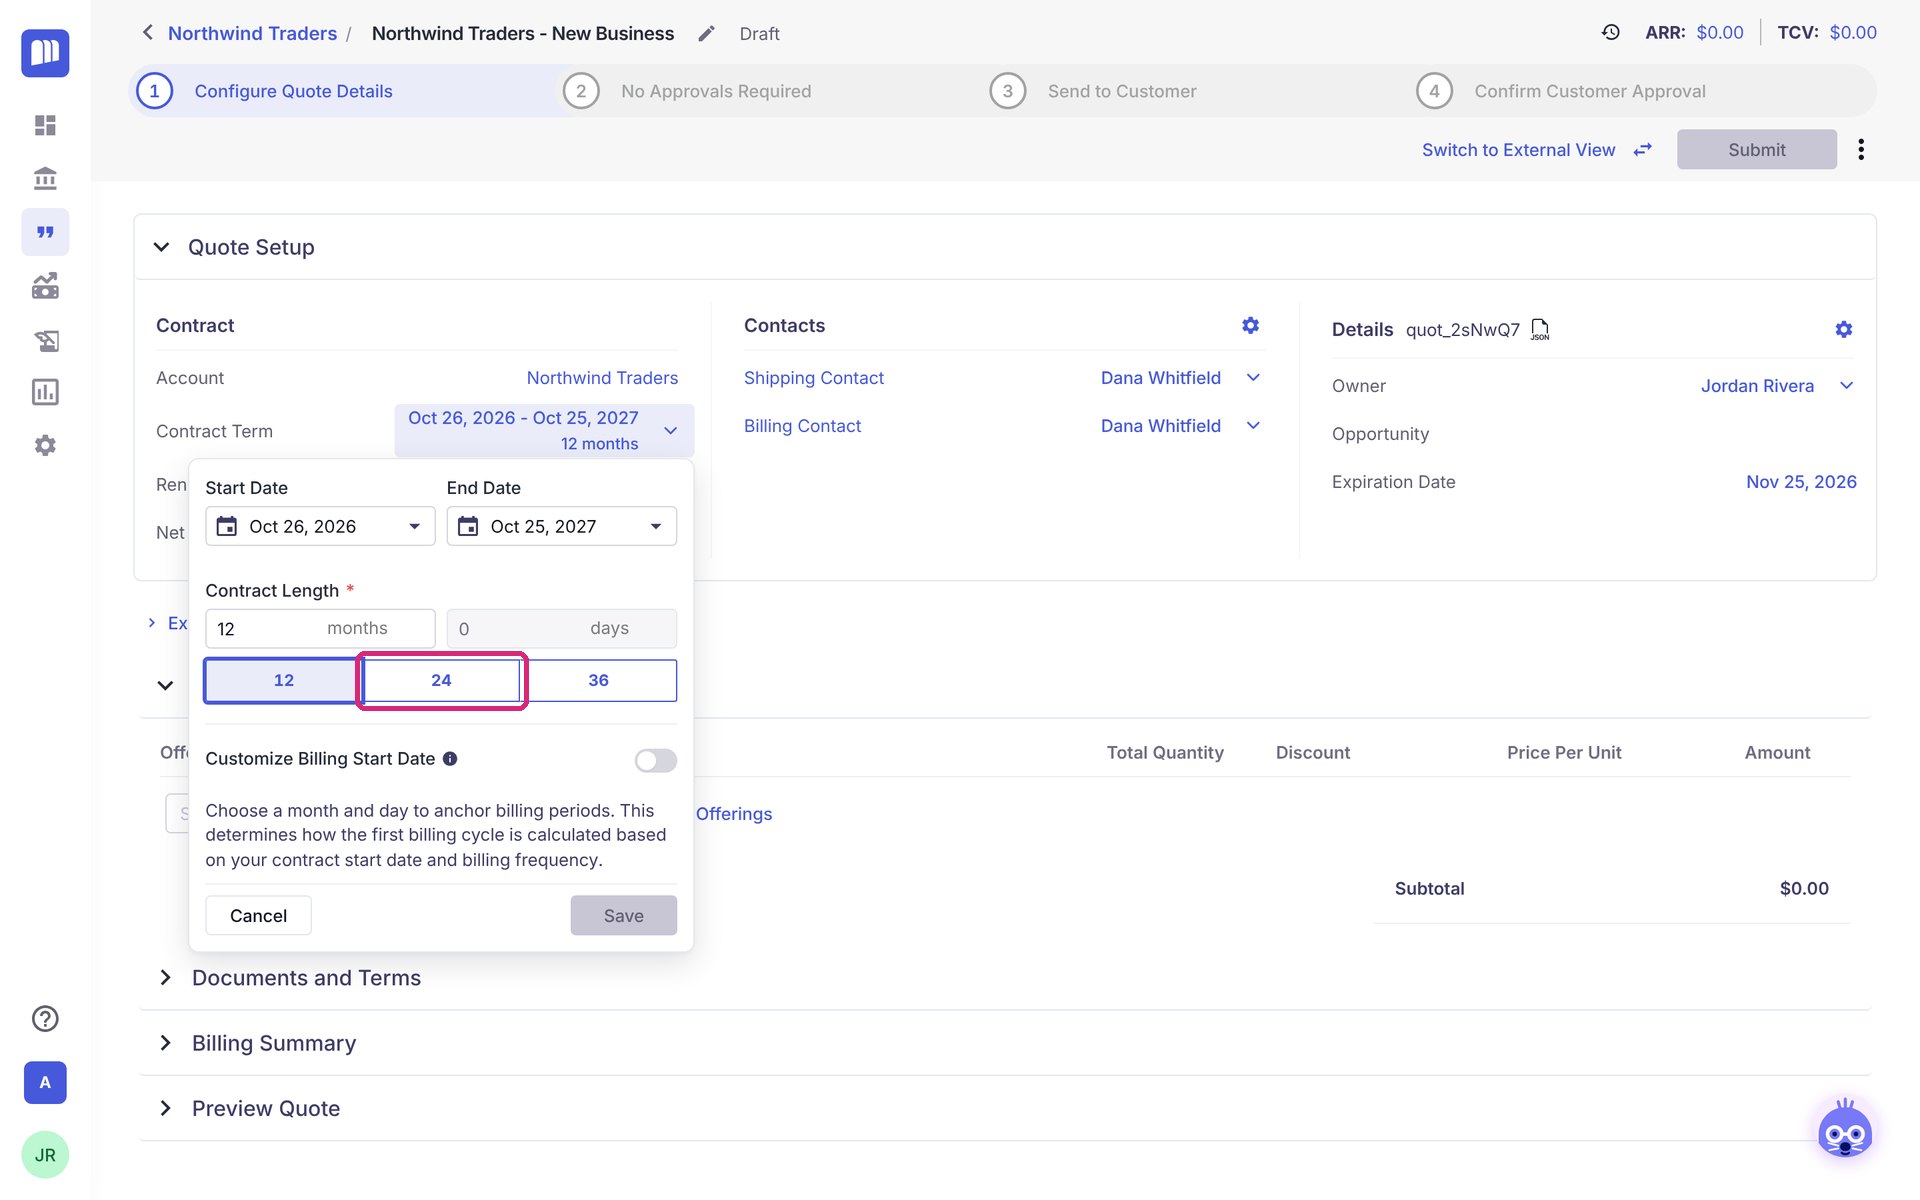
- Click the contract dates next to Contract Term. They show 12 months for now.
- Click 24.
- Click Save.
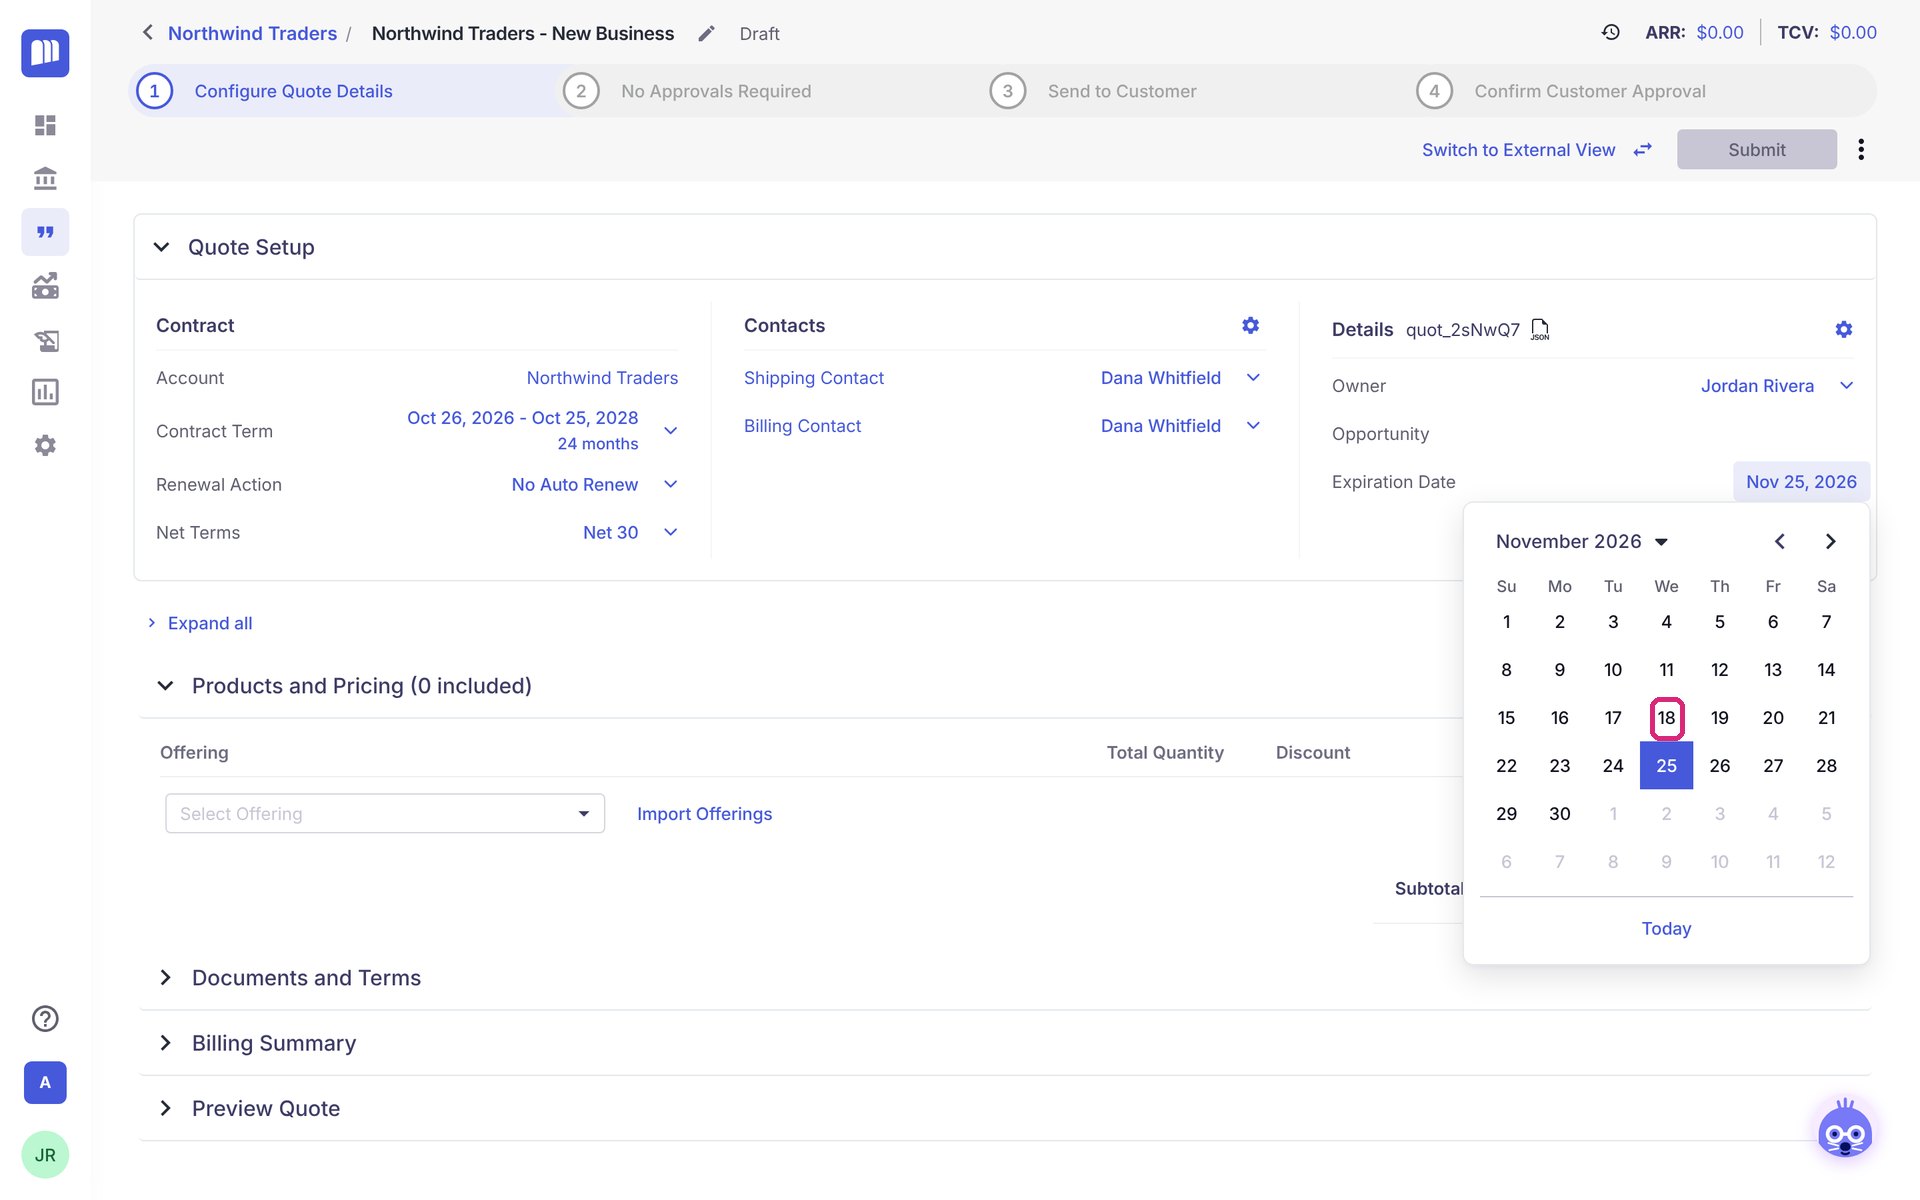
Step 5: Set an expiration date for the quote
The Expiration Date is the last day the customer can accept this quote. A shorter deadline creates urgency.
- Click the date next to Expiration Date.
- Pick a date one week earlier, so the deal closes before month end.
Step 6: Add what you're selling
-
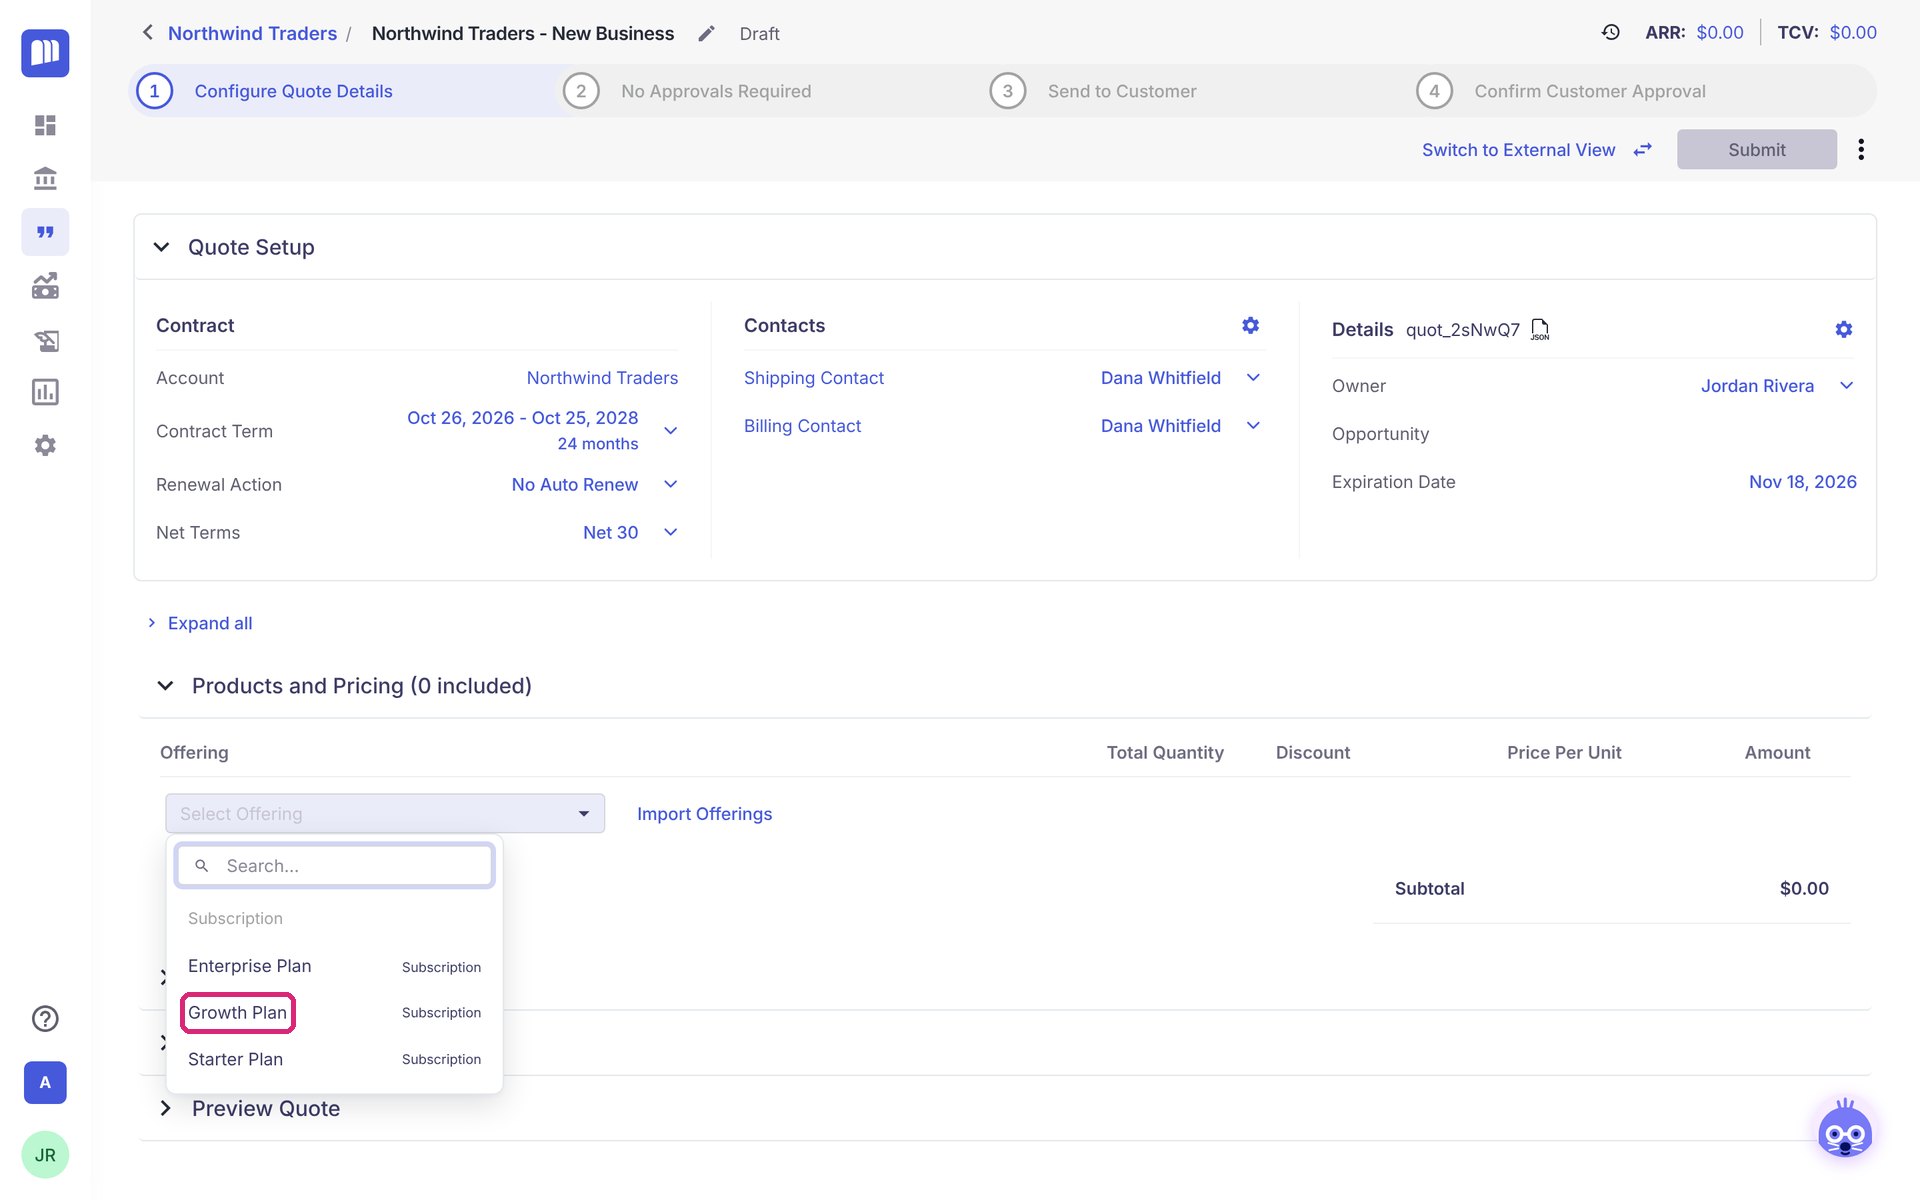
Under Products and Pricing, click Select Offering and pick Growth Plan.
-
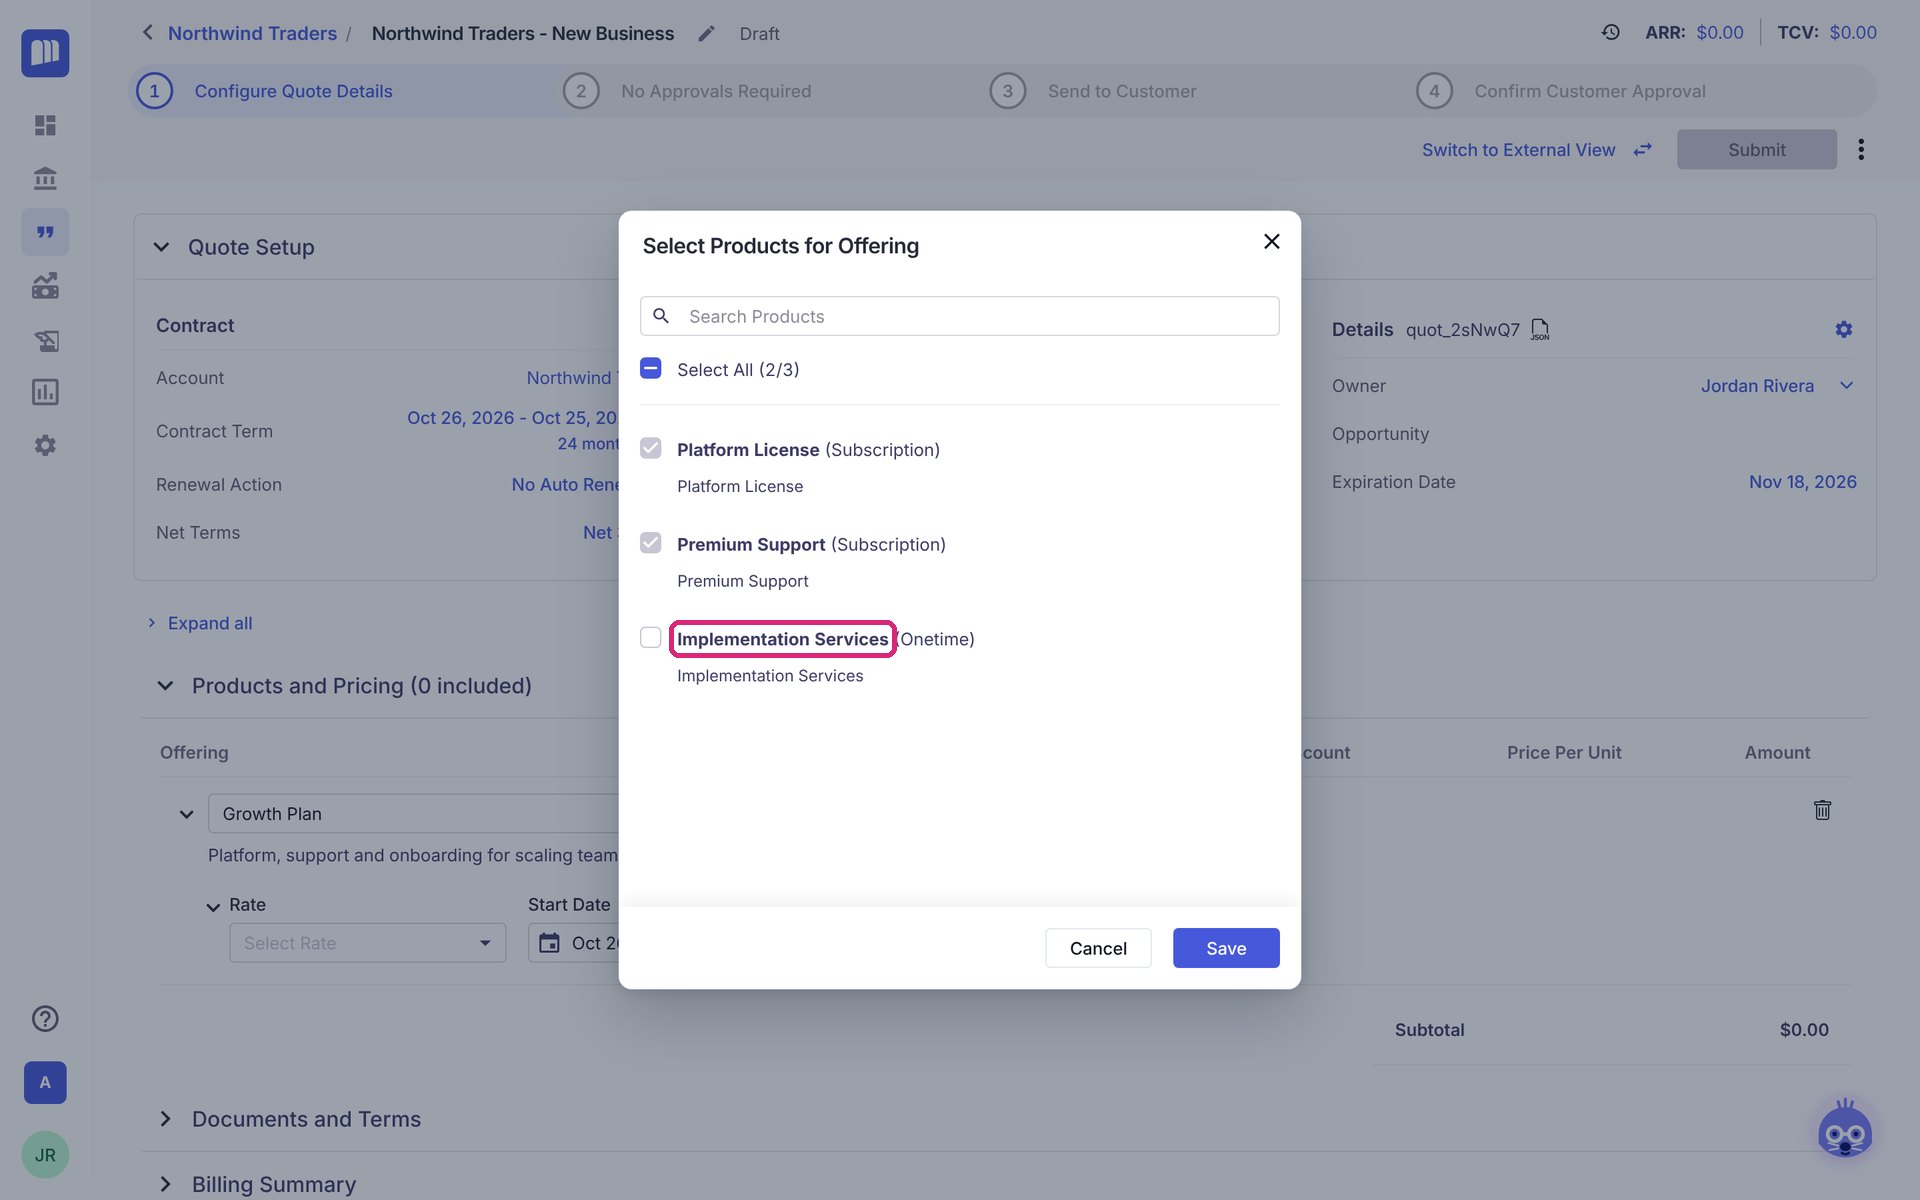
A window pops up because Growth Plan has an optional add-on. The included products are already ticked. Tick Implementation Services to add onboarding, then click Save.
-
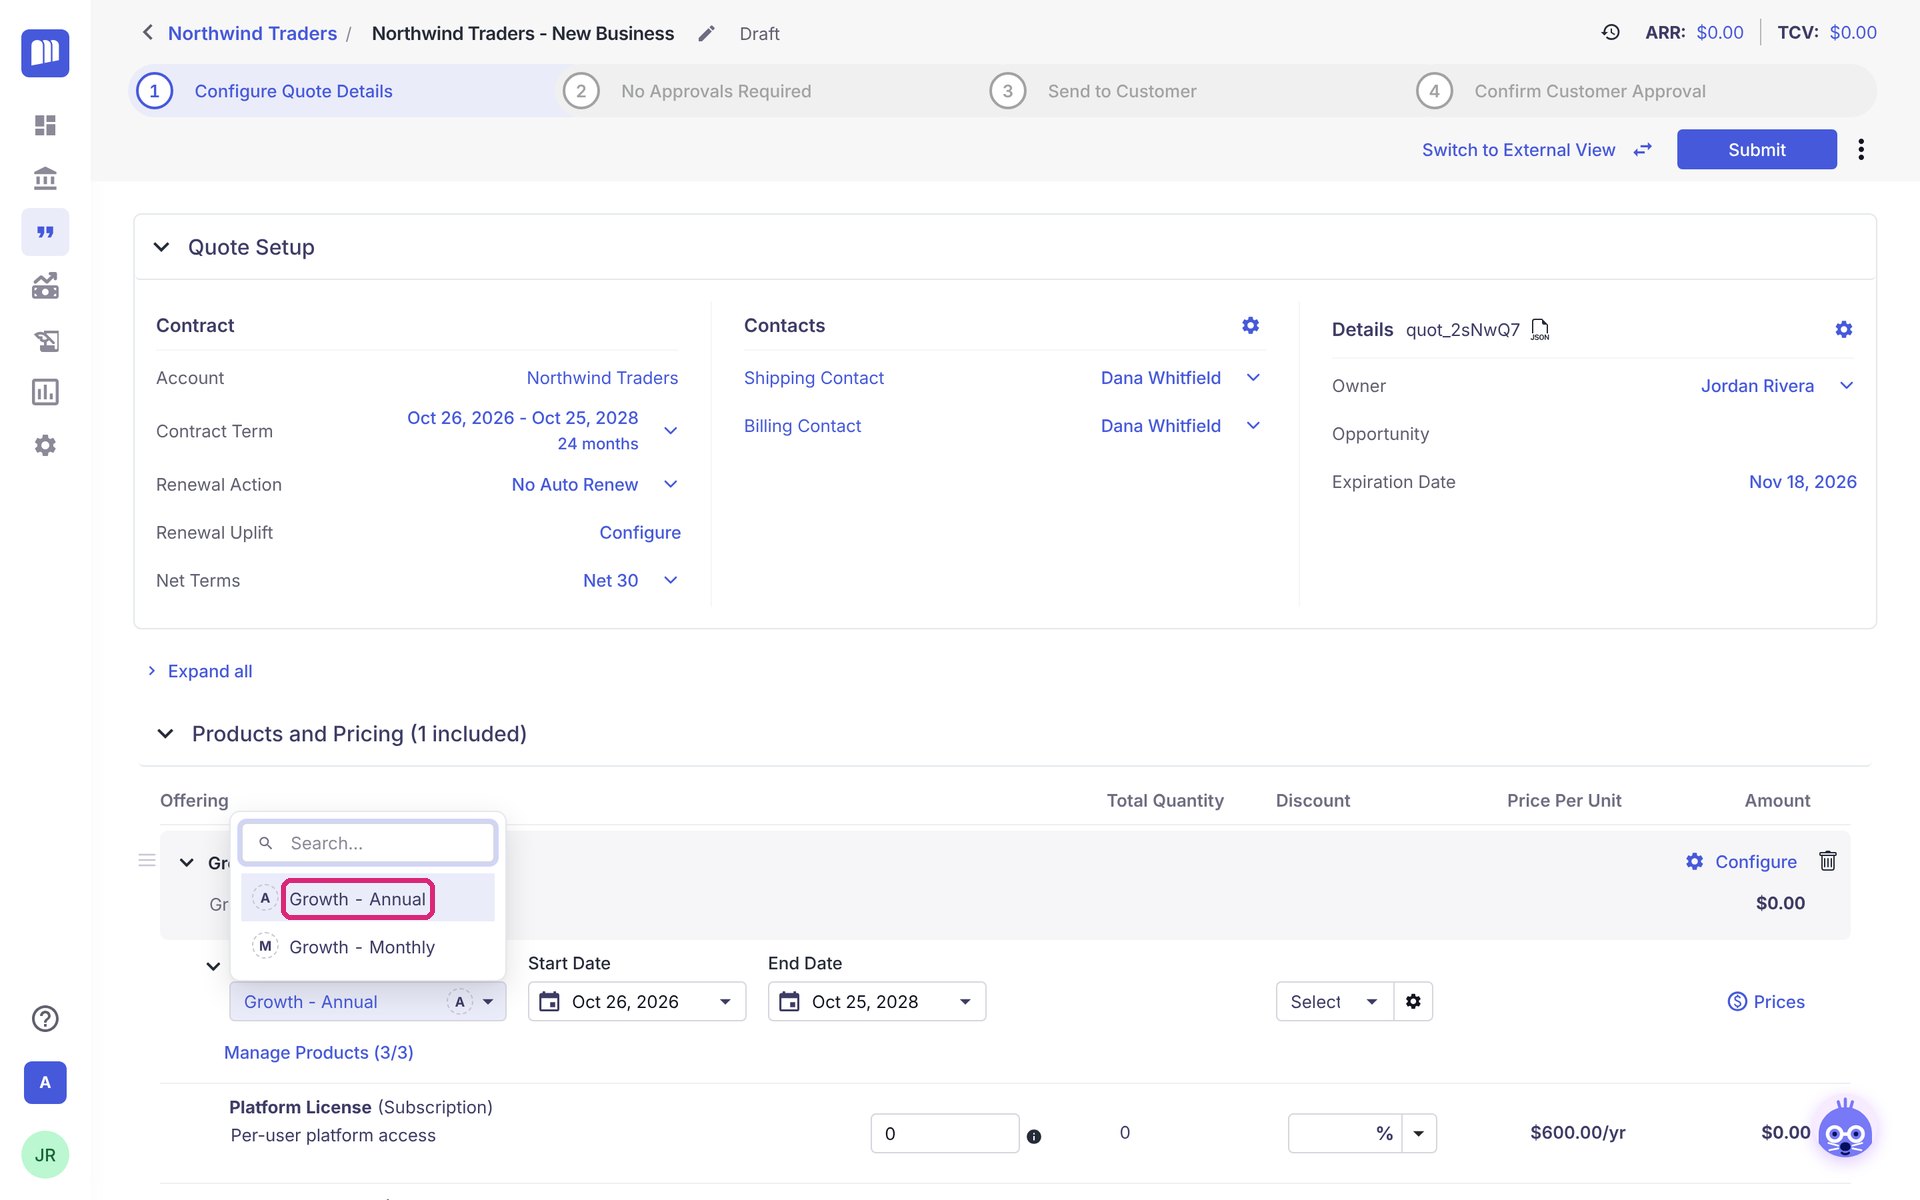
Click Select Rate and pick Growth - Annual. The rate is the price list to use; this one bills the customer once a year.
Step 7: Enter quantities and a discount
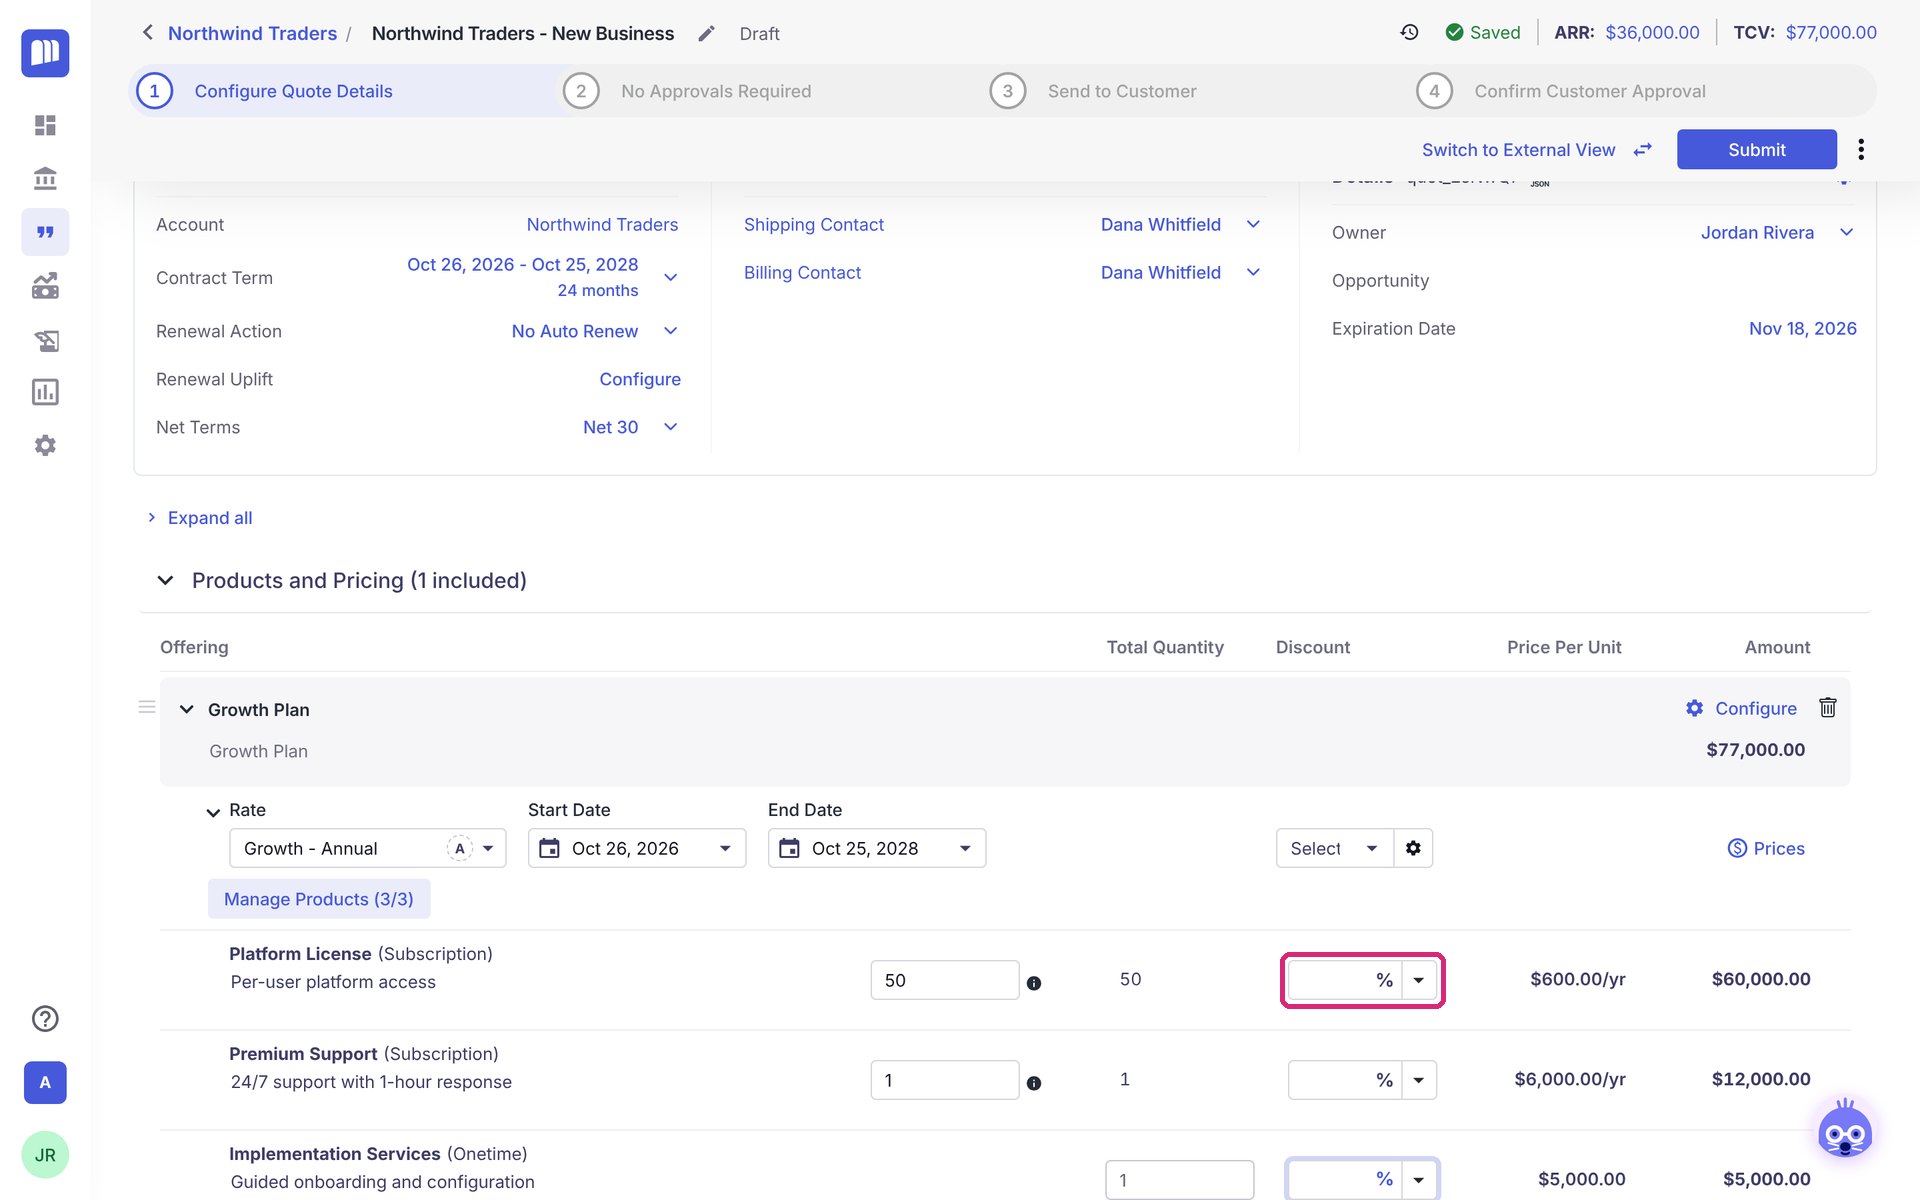
- Type how many of each product the customer is buying: 50 Platform License seats, 1 Premium Support, 1 Implementation Services.
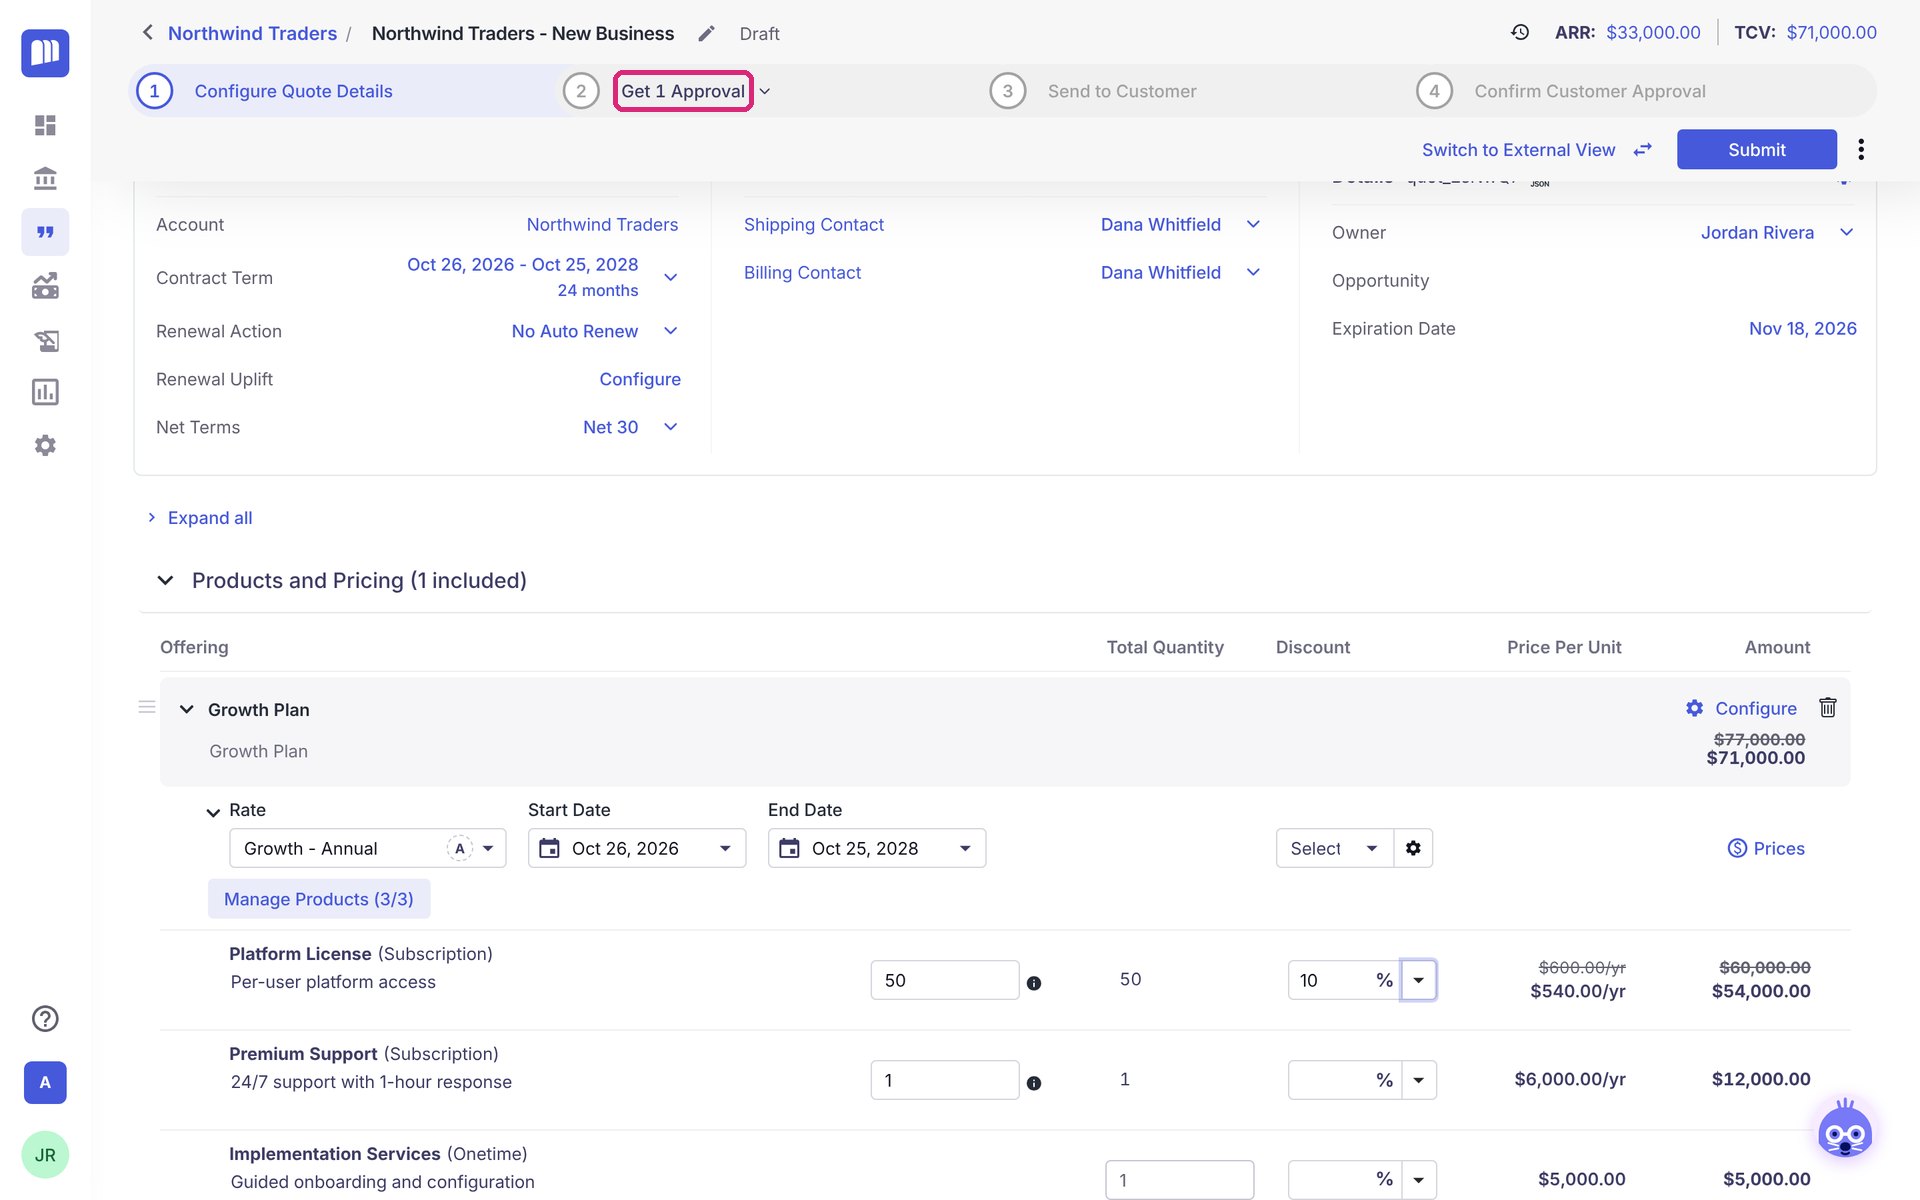
- In the Discount box on the Platform License line, type 10. That's a 10% discount.
The new price appears next to the crossed-out list price, and the totals at the top update right away (ARR is the yearly recurring value, TCV is the total value of the whole contract).
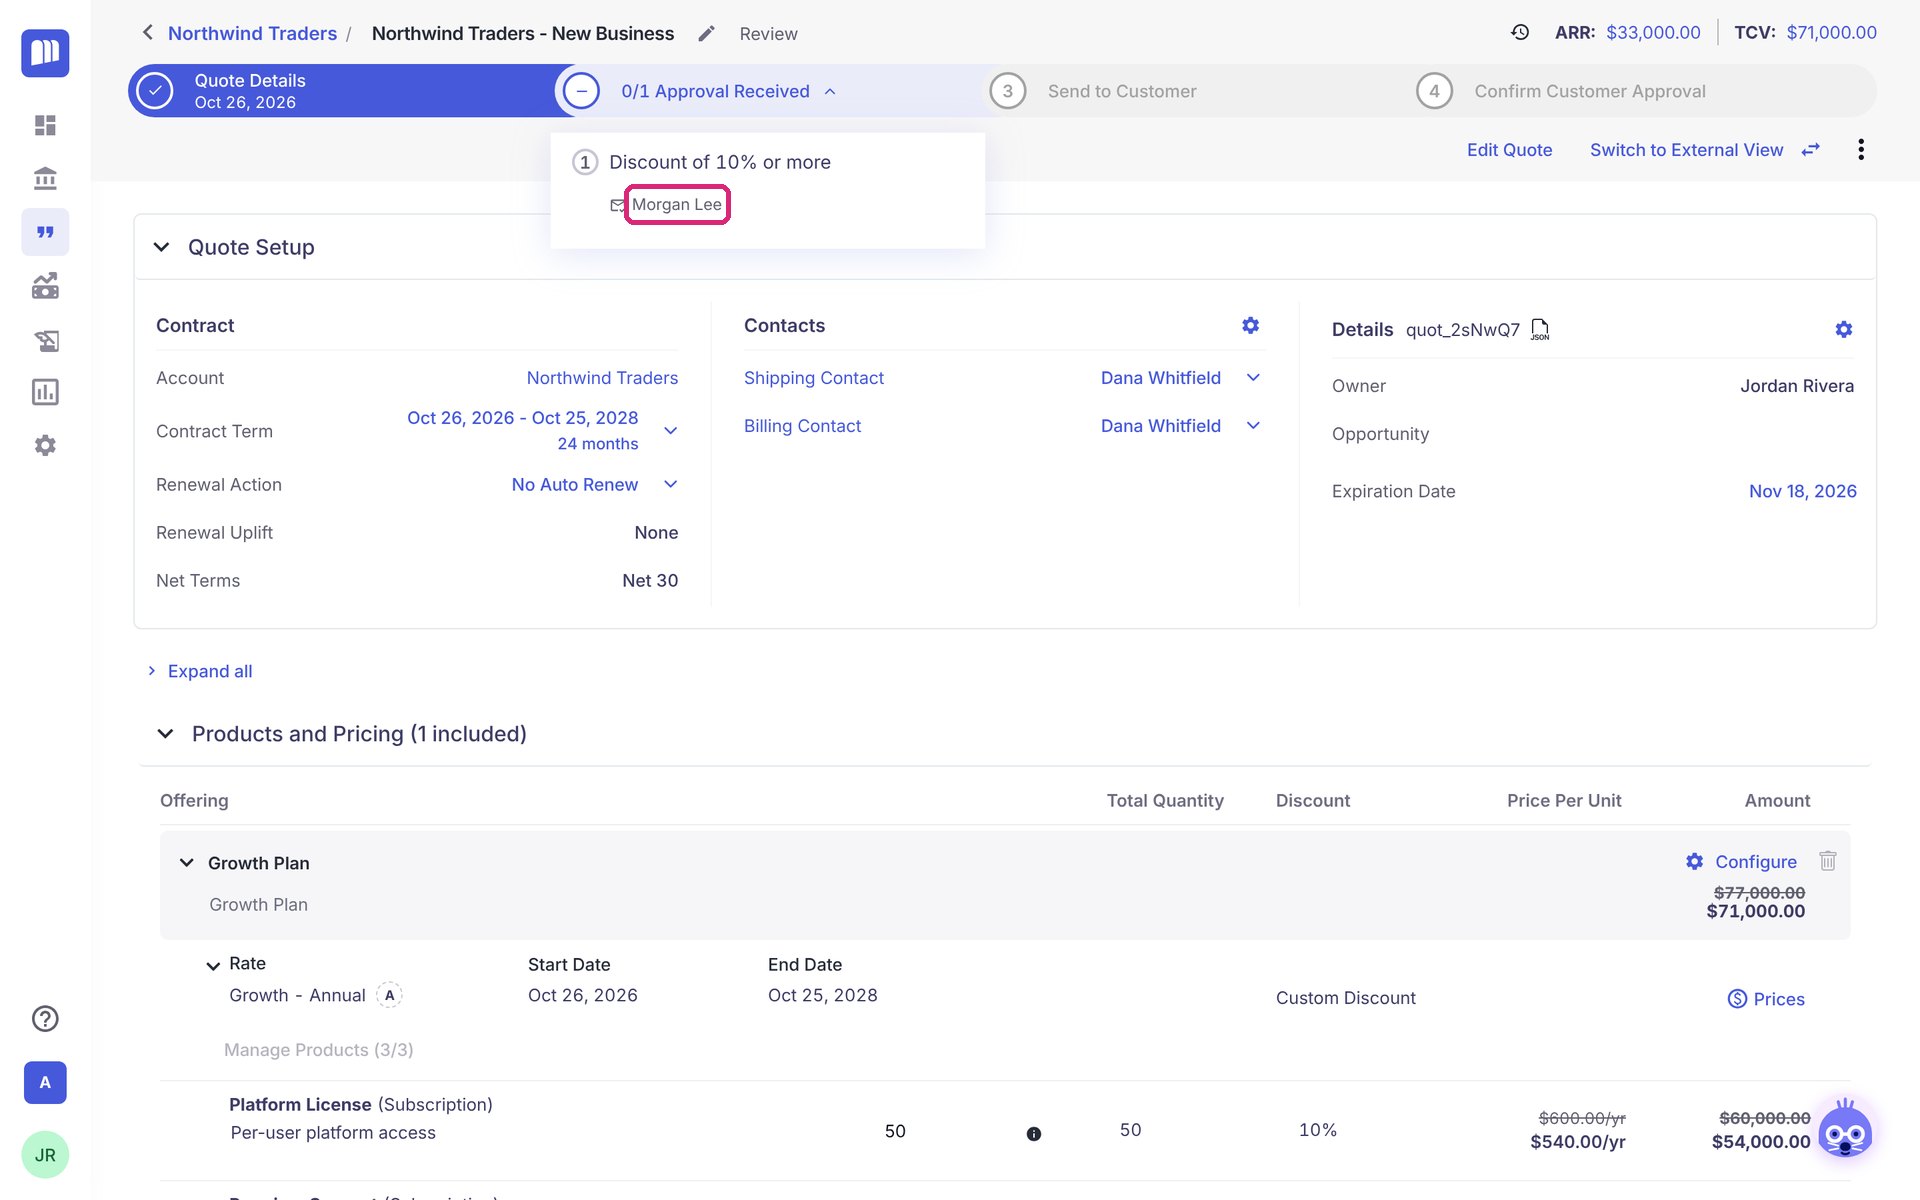
Notice the progress bar at the top now says Get 1 Approval. Your company requires a manager's sign-off for discounts this size.
Step 8: Check what the customer will be invoiced
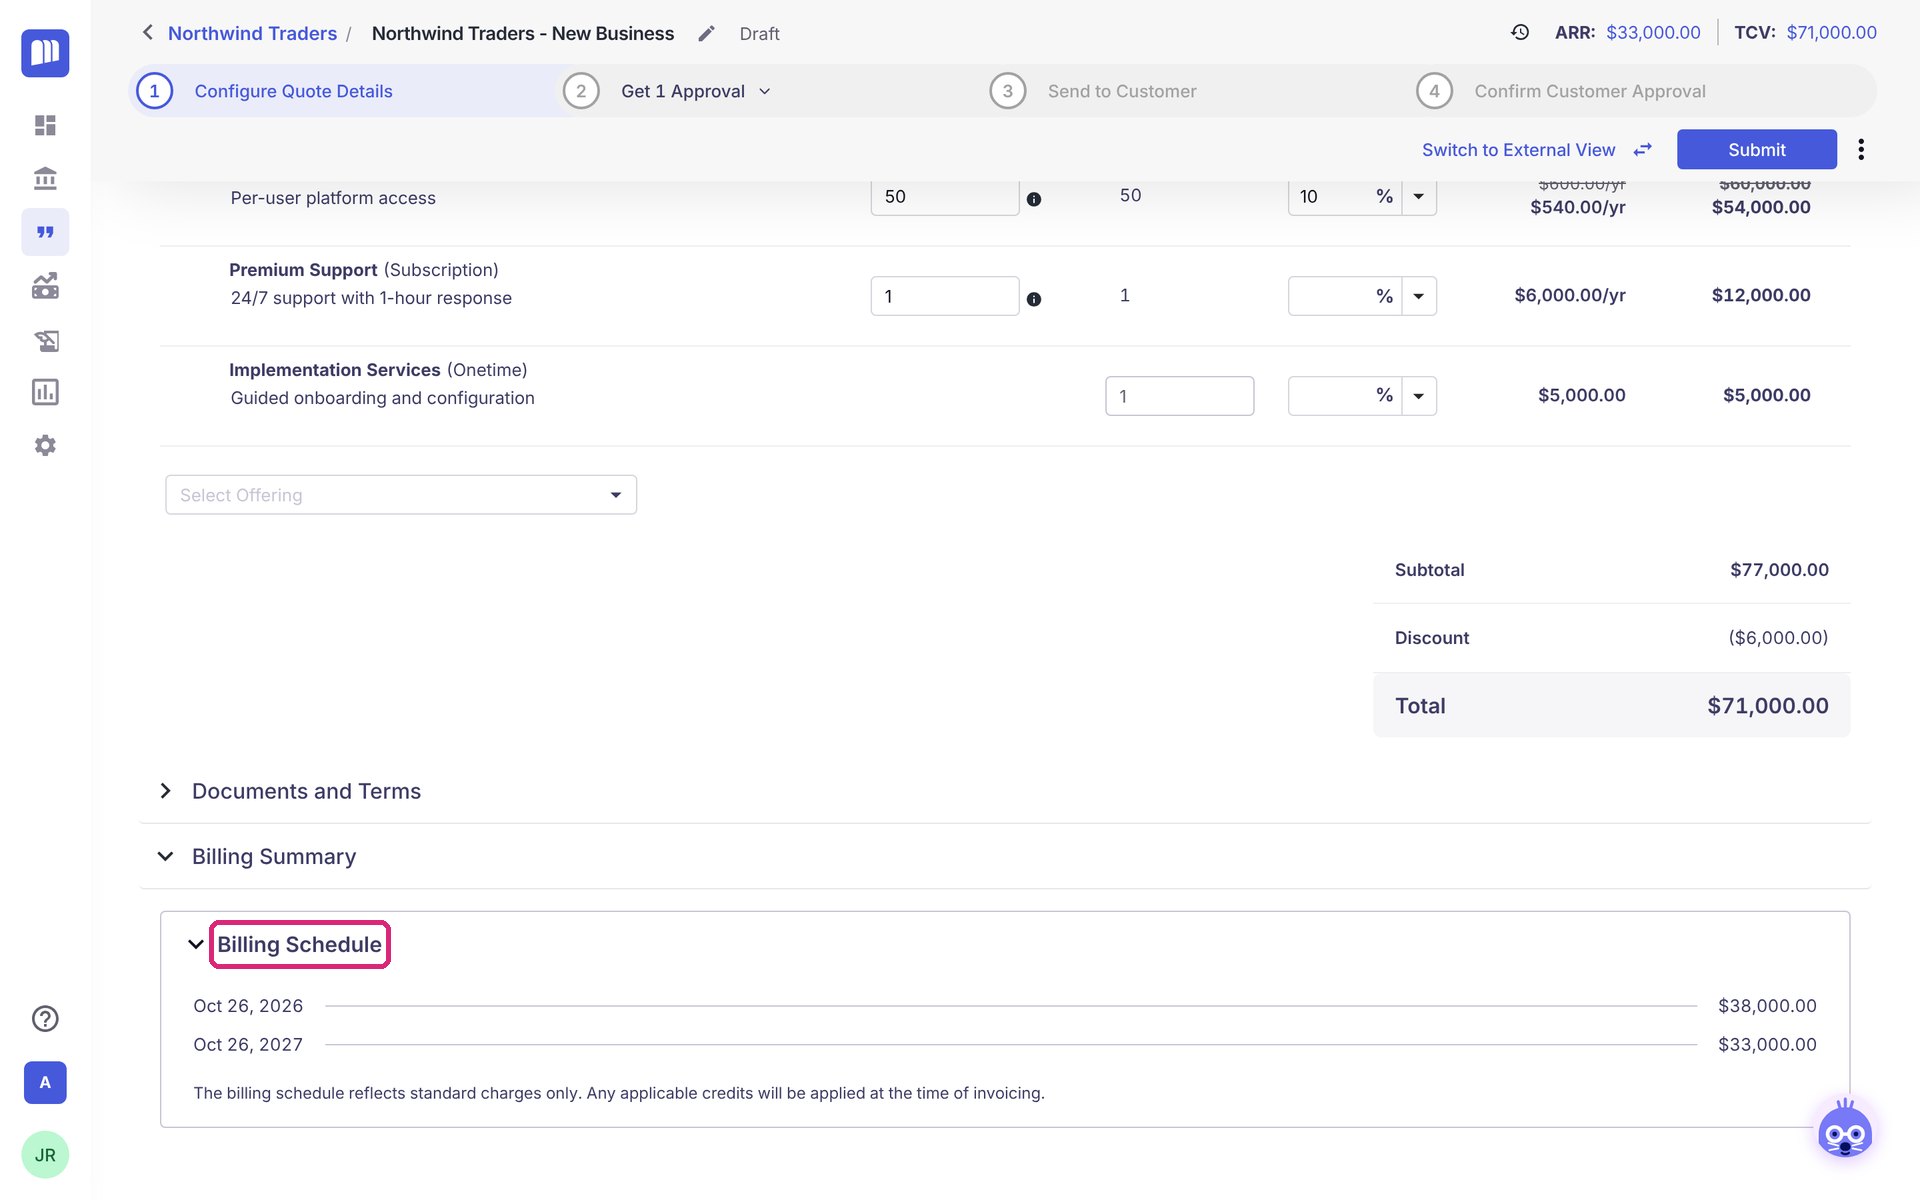
Click Billing Summary to open it. The Billing Schedule shows each invoice and its amount. The first invoice is bigger because it includes the one-time onboarding fee.
Step 9: Send it for approval
- Click Submit at the top right.
- Tell your approver why this deal deserves the discount in Approval Notes, then click Save.
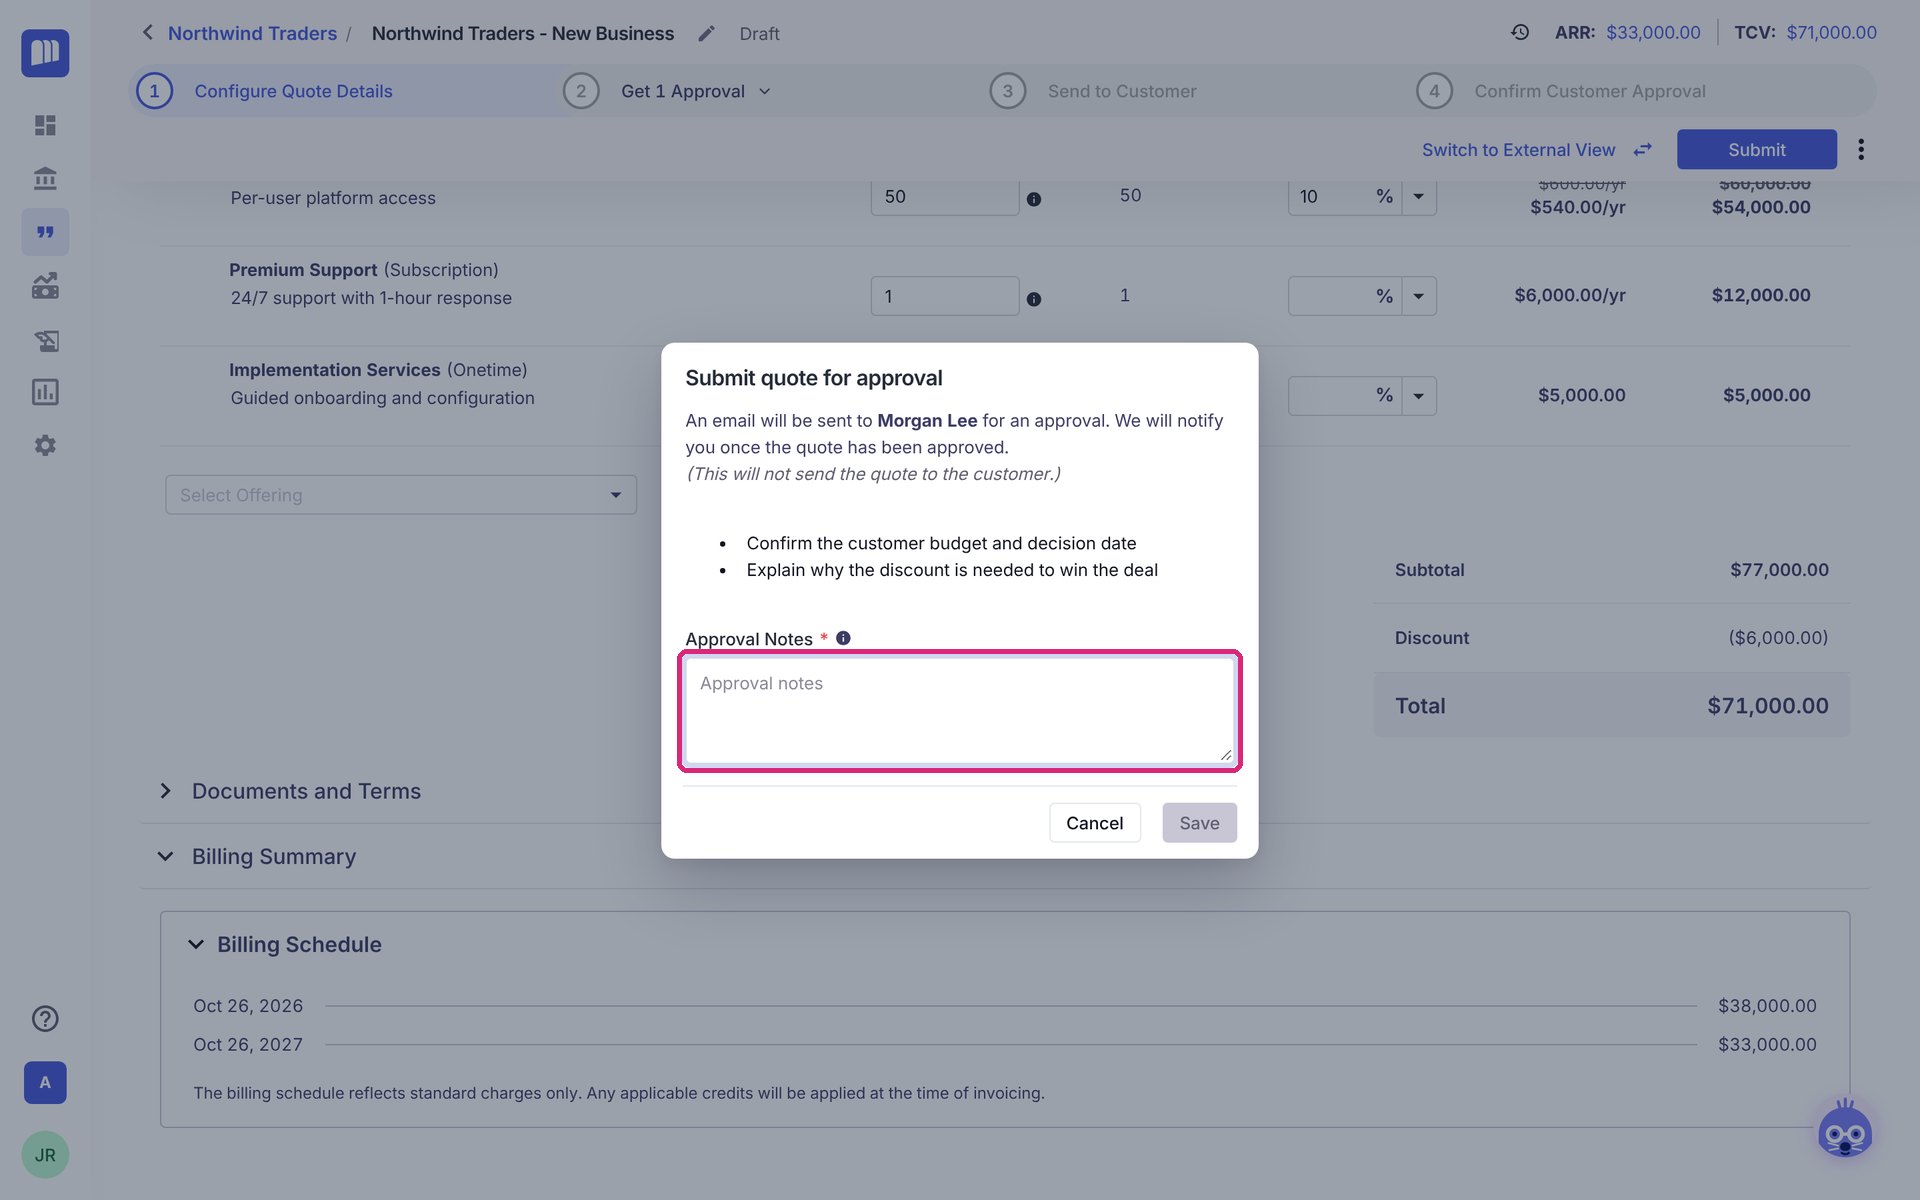
That's it. Your quote is now in Review and your approver gets an email. The customer doesn't see anything yet. To check who you're waiting on, click the approval step in the progress bar.
What's next
Once your quote is approved, send it to your customer for signature.
Quick how-tos
Start a quote from the customer's page
Open the customer's account, click New, then Quote. The customer is filled in for you.
Quote a customer who isn't in MonetizeNow yet
In the New Quote window, click Create New Account. Fill in the customer's details, click Next, and carry on as usual.
Add to an existing customer's contract (upsell)
- In New Quote, pick the customer.
- Under Select Contract, choose their current contract.
- Choose Amend.
Renew a customer's contract
Follow the steps above, but choose Renew instead of Amend. A canceled contract can't be renewed; start a new quote instead.
Start from a saved template
In New Quote, pick a template under Create from Blueprint. Your quote starts with the template's products and settings already in place.
Change the contract length or start date
Click the dates next to Contract Term, change the Start Date or the number of months, and click Save.
Change payment terms
Use the Net Terms drop-down in the Contract box, for example Net 30 (the customer pays within 30 days of each invoice).
Send invoices to a different person
In the Contacts box, click Select next to Billing Contact and pick someone else, or click + New Contact to add them.
Add more than one offering
After you add the first offering, a new Select Offering box appears below it. Repeat as many times as you need.
Raise the price partway through a contract
Hover over the offering and click + Schedule Change. Pick the new price list (Rate) and the dates it applies, then click Add. This is often called a "ramp".
Give a dollar discount instead of a percentage
In the Discount box, click the arrow next to %, switch to a dollar amount, and type the value.
Remove an offering
Click the trash can icon on the offering.
Hide the discount from the customer's PDF
Click Switch to External View, then Customize Settings, and turn off the discount details.
Make changes after you've submitted
Click Edit Quote. The quote goes back to Draft so you can change it. If it was already approved, you'll be warned that you need approval again.
Cheat sheet
The New Quote window
| Field | Do you need to fill it in? | What it's for |
|---|---|---|
| Existing Account | Yes | The customer you're quoting. |
| Create from Blueprint | No | Start from a saved template. |
| Select Contract | Yes | + New Contract for a new deal, or the customer's current contract to upsell or renew. |
| Amend / Renew | Yes, if you picked a contract | Upsell the current contract or renew it. |
| Legal Entity | Only if your company has more than one | Which of your companies is selling. |
| Currency | Only if your company sells in more than one | The currency for the quote. |
| Link a Salesforce Opportunity | No | Connects the quote to the deal in Salesforce. |
| Linked Account | No | A partner or reseller you're quoting through. |
The top of the quote
| You'll see | What it means |
|---|---|
| Quote name | Click the pencil to rename it. |
| Draft, Review, Approved… | Where the quote is in its journey (see the status table below). |
| Saved | Your latest change has been saved. |
| ARR | The yearly recurring value of the deal. |
| TCV | The total value of the whole contract, including one-time fees. |
| Progress bar | Your next steps: set up the quote, get approvals, send to the customer, get their signature. |
| Switch to External View | See the quote as your customer will. |
| Submit | Sends the quote for approval, or makes it ready to send. If it's greyed out, hover over it to see what's missing. |
Quote statuses
| Status | What it means | Can you change it? | What happens next |
|---|---|---|---|
| Draft | You're still building it | Yes | Click Submit |
| Review | Waiting for approval | No | Your approver approves or declines |
| Approved | Ready to go to the customer | No | Send it for signature |
| Denied | The approver said no | No | Click Edit Quote, fix it, resubmit |
| Sent | With the customer | No | The customer signs, or you mark it accepted |
| Accepted | The customer said yes | No | Finance processes it |
| Processed | It's now a live contract | No | Billing starts |
| Expired | The deadline passed | No | Reopen it or create a new quote |
| Canceled | Called off | No | Recreate it if the deal comes back |
Good to know
What are Products, offerings and rates?
A product is one thing you sell, like a user license. An offering is a package of products sold together, like "Growth Plan". A rate is the price list for that package and how often the customer is billed (yearly, monthly). You build quotes from offerings, so everyone quotes from the same approved price list. You only adjust quantities and discounts.
Why some products are already ticked
Some products always come with an offering, so they're ticked for you. Others are optional add-ons you can include or leave out. To change them later, click Manage Products on the offering.
Why there's no Save button
Everything on the quote saves as you go, so you can't lose your work. Pop-up windows, like the contract dates, have their own Save so you can back out with Cancel.
Why the totals change when you change the dates
Prices are worked out from the contract length. Make a 12-month deal 24 months and the yearly products double, while one-time fees stay the same.
Why some quotes need approval
Your sales leadership or RevOps team sets the rules, for example "discounts of 10% or more need manager approval". MonetizeNow checks your quote against these rules as you build it, so you'll know before you submit. If your quote is changed after approval, it needs approving again, so customers only ever see approved terms.
Your view and the customer's view
The normal view is your workspace, with all the pricing detail. Switch to External View shows exactly what your customer will get, and Customize Settings lets you choose what they see.
Updated 7 days ago