NetSuite
Overview
MonetizeNow syncs Invoices, Customers and related data with NetSuite so that you can perform accounting accurately.
Configuring Netsuite
Configuration Overview
Steps:
- Ensure REST web-services is enabled
- Create a role with the right permissions
- Assign the role to a new user
- Create an application
- Create access tokens
- Find your Account ID
- Configure the Netsuite connection
Ensure REST web-services is enabled
Setup > Company > Enable Features
Choose the SuiteCloud tab
Ensure REST WEB SERVICES is checked
Save if required
Create a new User role
To grant access to the Netsuite, you need to create a user role to get Access Tokens using Token-Based Authentication. Ensure you are logged in to Netsuite as an Administrator.
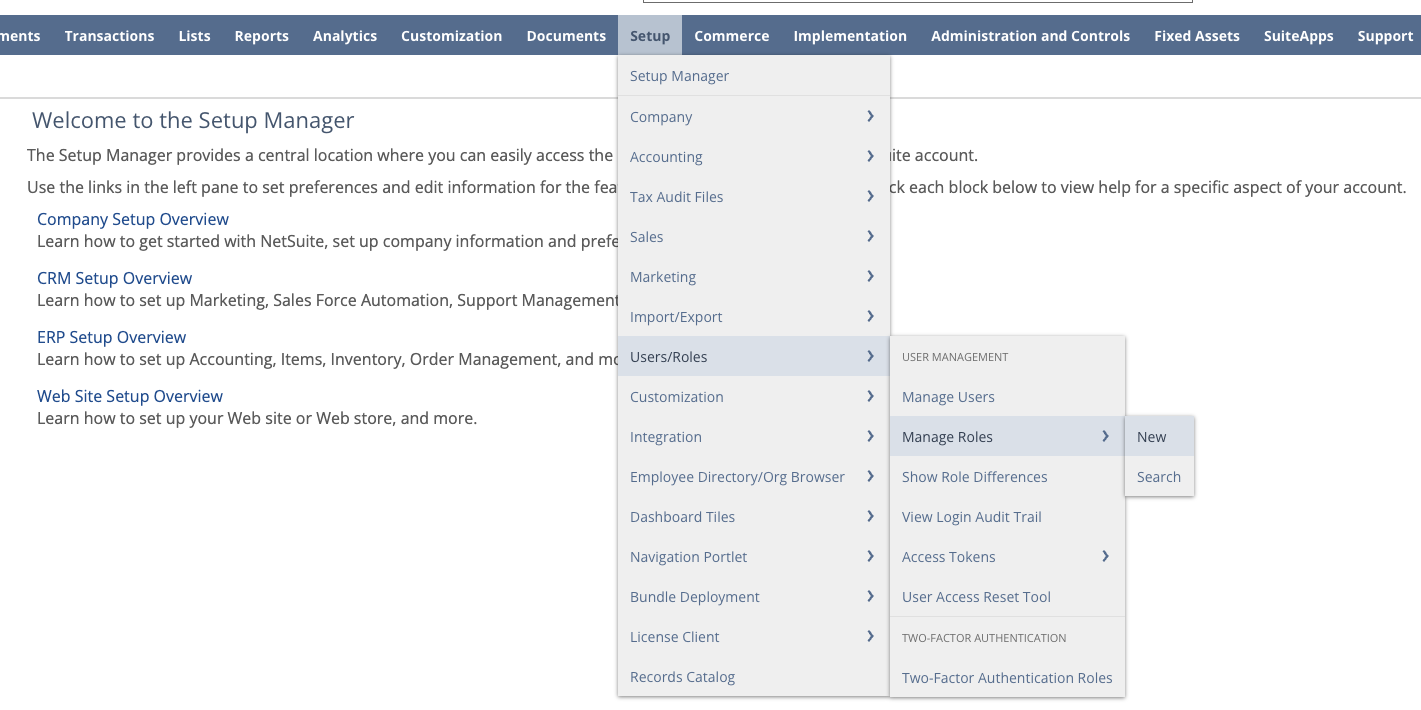
Setup > Users/Roles > Manage Roles > New
Select the permissions for this role
The following Permissions are required:
| Type | Permission | Level |
|---|---|---|
| Transactions | Credit Memo | Edit |
| Transactions | Customer Deposit (potential future use) | Create |
| Transactions | Customer Payment | Edit |
| Transactions | Customer Refund | Edit |
| Transactions | Find Transaction | View |
| Transactions | Invoice | Edit |
| Transactions | Posting Period on Transactions | Edit |
| Reports | SuiteAnalytics Workbook | Edit |
| Lists | Accounts | Edit |
| Lists | Companies | Edit |
| Lists | Contacts | View |
| Lists | Currency | View |
| Lists | Custom Record Entries | Edit |
| Lists | Customers | Edit |
| Lists | Items | Edit |
| Lists | Perform Search | View |
| Lists | Publish Search | View |
| Lists | Record Custom Field | Edit |
| Lists | Related Items | Edit |
| Setup | Custom Entity Fields | View |
| Lists | Subsidiaries | View |
| Setup | Access Token Management | Full |
| Setup | Allow Non G/L Changes Required to apply and unapply payments and credits in closed financial periods | Full |
| Setup | Custom Fields | View |
| Setup | Custom Record Types | View |
| Setup | Log in using Access Tokens | Full |
| Setup | REST Web Services | Full |
| Setup | SOAP Web Services | Full |
| Setup | User Access Tokens | Full |
| Setup | View SOAP Web Service Logs | Full |
| Setup | Custom Record - If you are using custom records for any entities, you may need to configure something here | Edit |
Create an integration user
This step is recommended, but optional. If you choose to use an existing user, then make sure that the newly created role is assigned to your user.
Lists > Employees > New
Enter the user details (e.x. MonetizeNow Integration)
Assign the newly created role from the previous step
Create an Integration Application
Setup > Integrations > Manage Integrations
You can use an existing integration, if you have one, or create a new one
- Name MonetizeNow Integration App
- Token-Based Authentication
- Select "Token-Based Authentication" and "TBA: Authorization Flow"
- Callback URL
https://integrations.monetizeplatform.com/vault/callback
- OAuth2
- Select "Authorization Code Grant" and "Rest Web Services"
- Redirect URI
https://integrations.monetizeplatform.com/vault/callback
ℹ️ Once saved, make sure to copy the Consumer Key and Consumer Secret
Create Access Tokens
Setup > Users/Roles > Access Tokens
Choose the application and user created in prior steps.
Choose a token name such as MonetizeNow Integration Token.
ℹ️ Once saved, make sure to copy the Token Id and Token Secret
Obtain your Account ID
Go to Setup > Company > Company Information and note your Account Id.
Configuring MonetizeNow
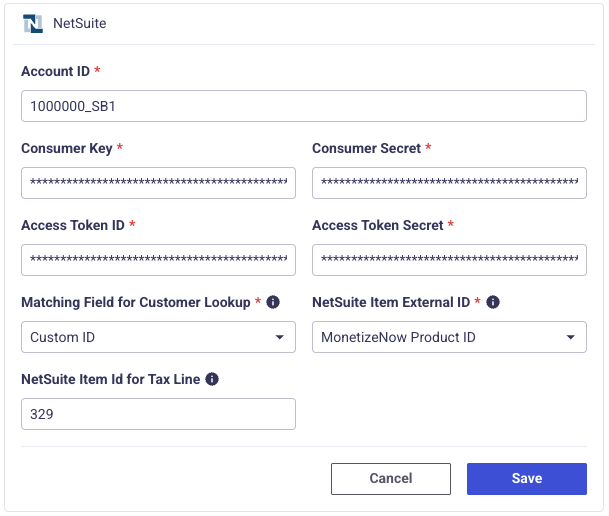
In MonetizeNow, got to Setup > Integrations > Accounting and select NetSuite.
Fill out the form with the data obtained in the prior steps.
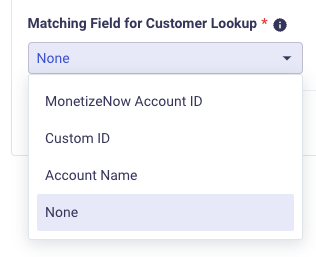
Matching Field for Customer Lookup
When MonetizeNow encounters a Customer that has not been seen previously, MonetizeNow can attempt to match the Account with an existing NetSuite Customer.
If you would like this behavior, choose an option which contains the data that you would like to use to match to an existing Netsuite Customer. If no match is found, the Customer will be created in NetSuite.
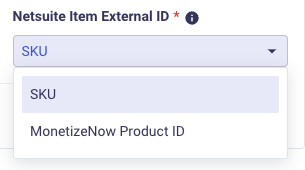
NetSuite Item External ID
MonetizeNow expects that your product catalog has been created in NetSuite manually. Choose which field in MonetizeNow will be used to match up to the item in NetSuite.
In NetSuite, the value of this field should be added as the "Item Name/Number"
NetSuite Item Id for Tax Line
If you have a tax provider configured, you will need to create a placeholder product in NetSuite which will be used to represent the taxes for invoices and credit notes.
Provide the id of the product here.
Note: If you have a tax provider configured and an invoice or credit note contains taxes, the invoice or credit note will not be eligible to sync to NetSuite until you have configured this field.
Updated 5 months ago